In my last blog post I talked about restoring an Apple Macintosh LC computer from 1990. The restoration process included repairing the power supply and motherboard and restoring the plastic case and keyboard back to their original colour.
At the end of the restoration I had a working computer that booted into Mac OS System 7 but I faced one problem, how to get software onto my new computer so I could actually use it.
My Apple Macintosh LC came with a 40Mb hard drive and a floppy drive. On the back is a SCSI port and serial port so I had several possible ways to transfer files to the computer.
The Floppy Drive
Apple Macintosh computers from this era came equip with a 3.5 inch high density floppy drive that could store 1.4MB of data.
There are several Macintosh archive websites available with a wide range of floppy disk images that are compatible with my Mac so all I needed to do was download the disk images and write them to a floppy disk.
Older macs used an 800KB double density drive with their own proprietary format but by the time my computer was built Apple had moved to the IBM 1440 standard that was common on IBM compatible PCs. In theory I should be able to buy a cheap USB floppy drive and use it to copy the disk images to floppy disks and this is what I initially tried.
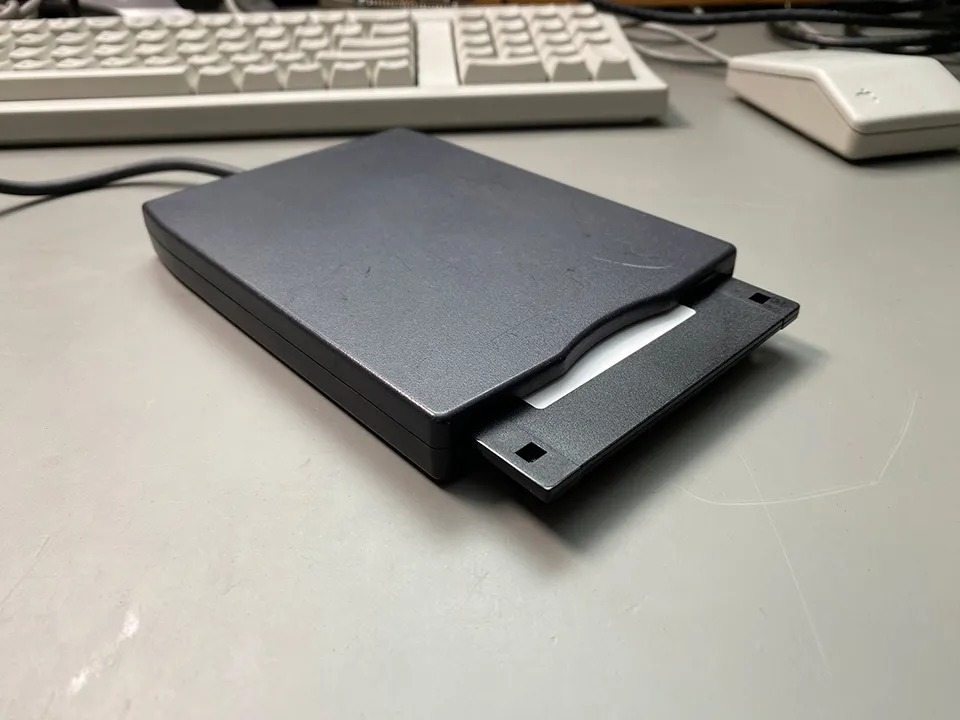
USB Floppy Drive
I decided to begin by upgrading the Mac to System 7.3, I wanted 7.5.5, which is the most recent version supported by my Mac, but I couldn’t find any floppy disk images for that version.
I used the dd disk cloning program that is available on Linux and Mac OS with the disk image as the source and the floppy drive as the destination. The device name for the floppy drive was /dev/sdb so I used the following command to write the image to disk.
sudo dd if=floppy-image.img of=/dev/sdb bs=512The floppy drive made the normal noises of a disk being written and once it was finished I put the disk in the Mac and turned it on. The Mac booted from the floppy disk and it looked like everything was working properly so I copied the other 6 disk images to floppy disks and began installing System 7.3 onto the hard drive. This is where things started to go wrong.
It would go through the motions of installing the software but it would always fail after the fifth disk. I presumed it must be a corrupt disk image so I found a different version and tried that but the new version failed after the fourth disk. The third attempt with another version from a different website failed after the sixth disk. Either all of the versions of Mac OS on the internet were corrupt or by USB floppy drive was failing to write the images to the disks.
After doing some research I found that USB floppy drives are not recommended for writing disk images for old computers. Most USB floppy drives contain a controller chip that presents the drive to the computer as a standard storage device with a FAT12 filesystem. They only work with standard PC-format disks (typically 1.44 MB HD 3.5” disks, sometimes 720 KB) and cannot handle non-IBM PC formats (Amiga, Atari ST, Apple, BBC Micro, copy-protected disks, etc.).
This limitation effectively locks the drive to a narrow set of “DOS-compatible” formats. The drive does not have the capability of writing to every sector on the disk so you can end up with disks that are missing data. This would explain why all of my attempts to create a set of install disks had failed. The solution that was recommended on most retro computing forums was a device called a Greaseweazle.
The Greaseweazle
The Greaseweazle is a USB floppy drive interface that works with standard floppy drives (3.5”, 5.25”, and even 8” with the right drive and cabling) and gives direct control of the floppy drive at the flux level (the raw magnetic transitions recorded on the disk). By capturing the raw magnetic flux data it bypasses the filesystem layer found in most USB floppy drives and allows software on the computer direct access to the disk so it can decode the flux data into whatever format is needed.
This makes the Greaseweazle ideal for retro-computing and archival, where disks may use unusual sector layouts, special encodings (MFM, FM, GCR, custom), or copy-protection schemes. It will allow me to read and write disks for the Apple Macintosh as well as my other computers that have a floppy drive including the Atari ST and Commodore Amiga.
I found a Greaseweazle for sale on eBay with the floppy cable and power cable so I ordered one along with an old 3.5” PC floppy drive. To keep everything looking tidy I found a 3D printed case that I used to mount the floppy drive and Greaseweazle.
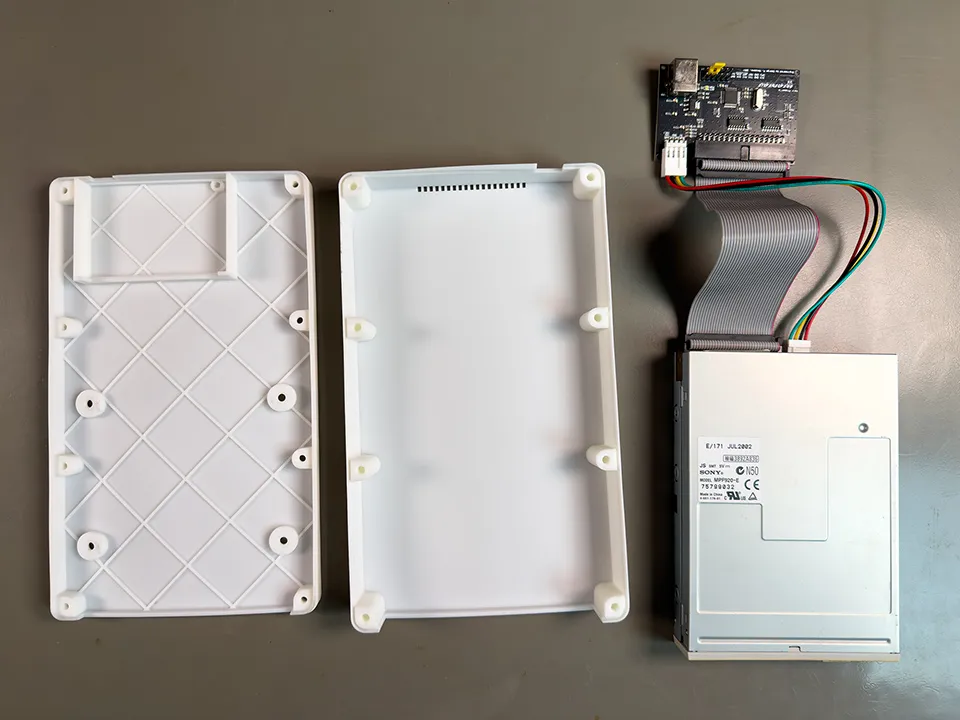
Greaseweazle Parts
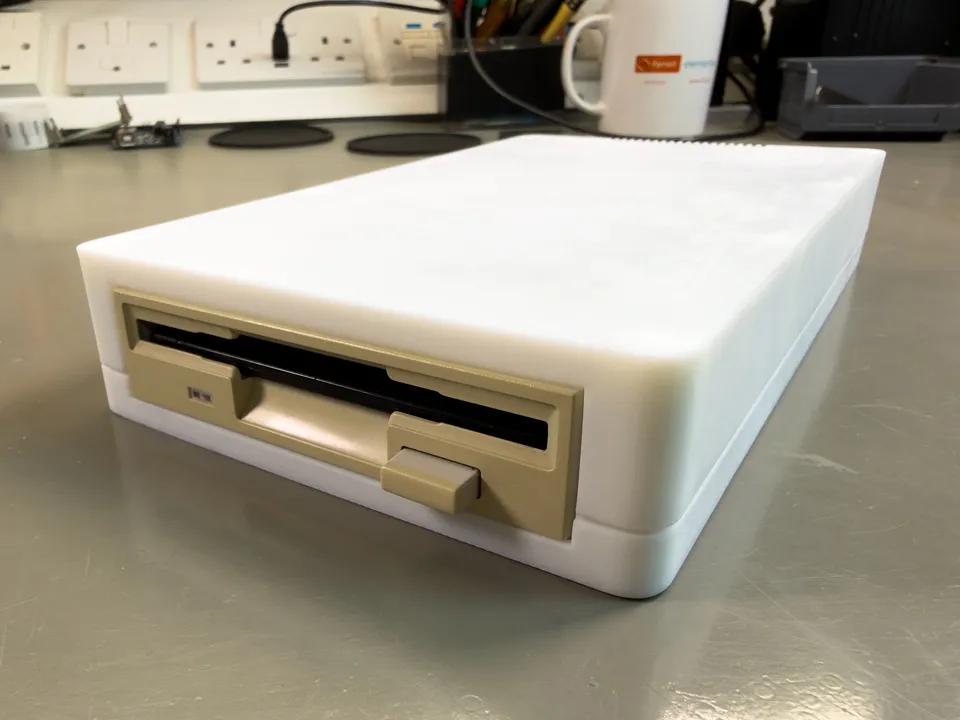
Greaseweazle fitted in Case
I installed the greaseweezle tools using the instructions on their GitHub repository https://github.com/keirf/greaseweazle/wiki/Software-Installation
For anyone wanting to get started with the Greaseweezle I would recommend reading Yann Serra’s tutorial which explains how to use the software to read and write to a wide variety of disk formats.
My Apple Macintosh uses the Macintosh HD (ibm.1440) format for floppy disks so I used the following command to write a set of System 7.3 disk images.
gw write --format=ibm.1440 diskimage.dsk --drive=1With the new set of disk images ready I put the first install disk into my Mac and turned it on. The Mac booted and started installing the software, this time it did not fail on any of the disks and after an hour of swapping floppy disks it had a working version of System 7.3.
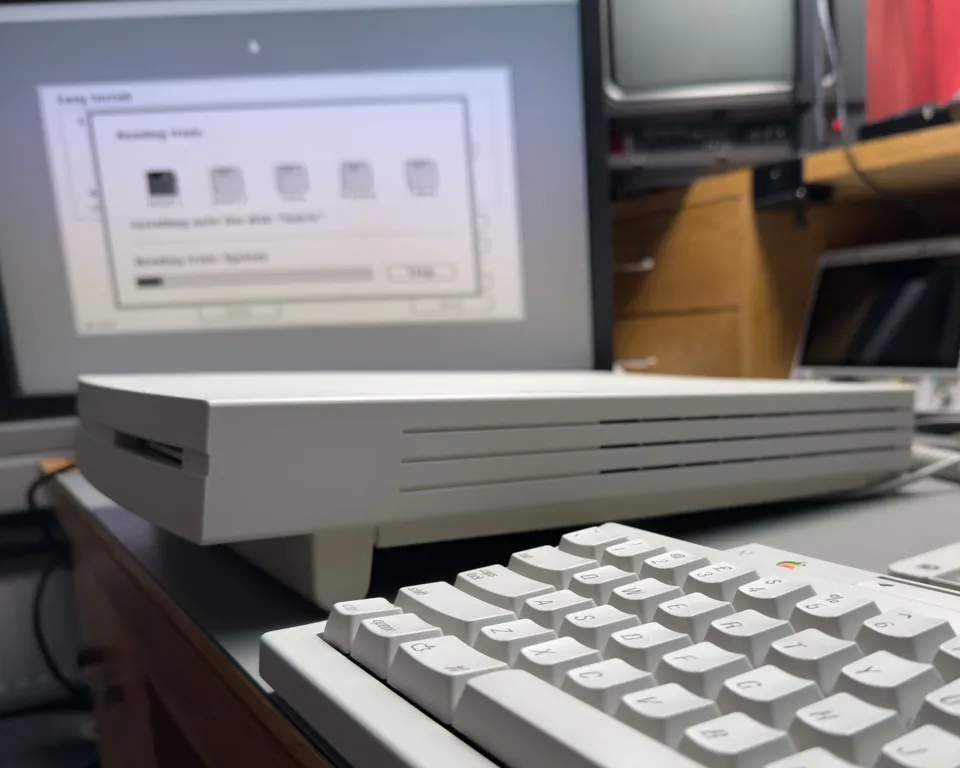
System 7.3 Installation
I copied several more application disk images to floppy disks and installed them on the Mac but I quickly found that some software was too big to fit on a disk. I could have split the files into several smaller disk images and then recombined them on the Mac but instead I chose a different option.
The Serial Port
Back in the days before ethernet became commonplace the most common way to transfer files, outside of floppy disks, was the serial port. Most computers had one and they all used the same RS232 standard so you could connect computers from different manufacturers together and they could communicate using terminal software.
Before I could use the serial port to transfer files to my Mac I would need a serial cable.
The standard for RS232 serial ports on computers is the 9 pin or 25 pin D-Sub connector. Apple being Apple decided that standards are for everyone else and used an 8 pin Mini-Din connector for their serial ports. Luckily there are still a few people selling 9 pin D-Sub to 8 pin Mini-Din cables so I was able to buy a cable that would allow me to connect the Mac to a modern computer.
With a cable in hand the next step was to find a more modern computer to connect to the other end. Serial ports have not been used on most computers since the introduction of USB in the late 90s to early 2000s. You can get USB to serial converters that will do the job but I decided to go a different route and used a Raspberry Pi with a Serial Pi Plus board on top which converts the Raspberry Pi’s UART port to an RS232 serial port.
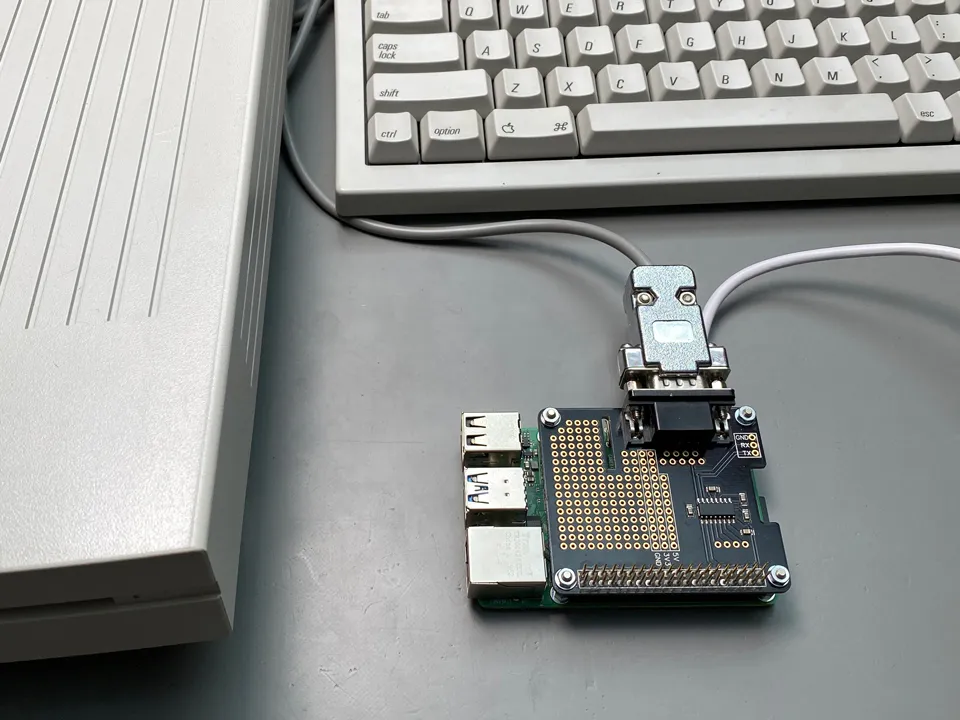
Raspberry Pi Connected Using a Serial Cable
To transfer files using serial you need software running on both ends that can manage the file transfers. The easiest way to do this is with a serial terminal program. There are several options available but I chose to use ZTerm on the Apple Macintosh and minicom on the Raspberry Pi.
Macintosh
ZTerm is a popular Macintosh terminal program and is small enough to fit on a floppy disk. I found a disk image containing ZTerm and used the Greaseweazle to write it to a disk. I put the disk in the Mac and copied ZTerm to the hard drive.
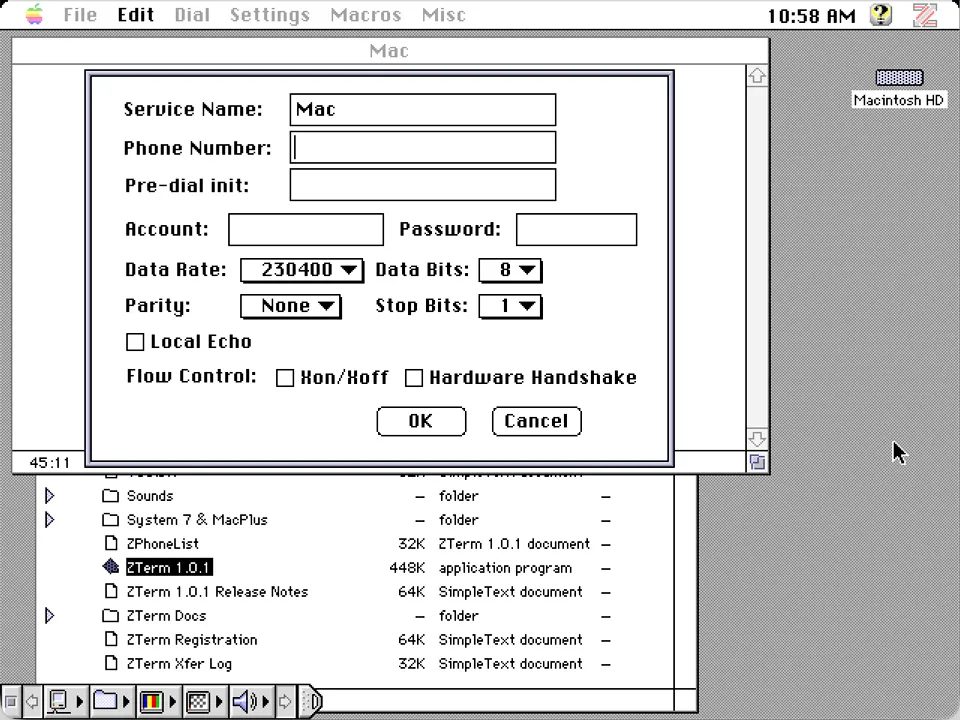
Before you can use ZTerm to receive files you will need to configure it.
Open ZTerm and from the Settings drop down menu select Connection. In the Connection window set the Data Rate, I used 115200, Data Bits: 8, Parity: None and Stop Bits: 1. Click OK to close the window.
ZTerm Connections Window
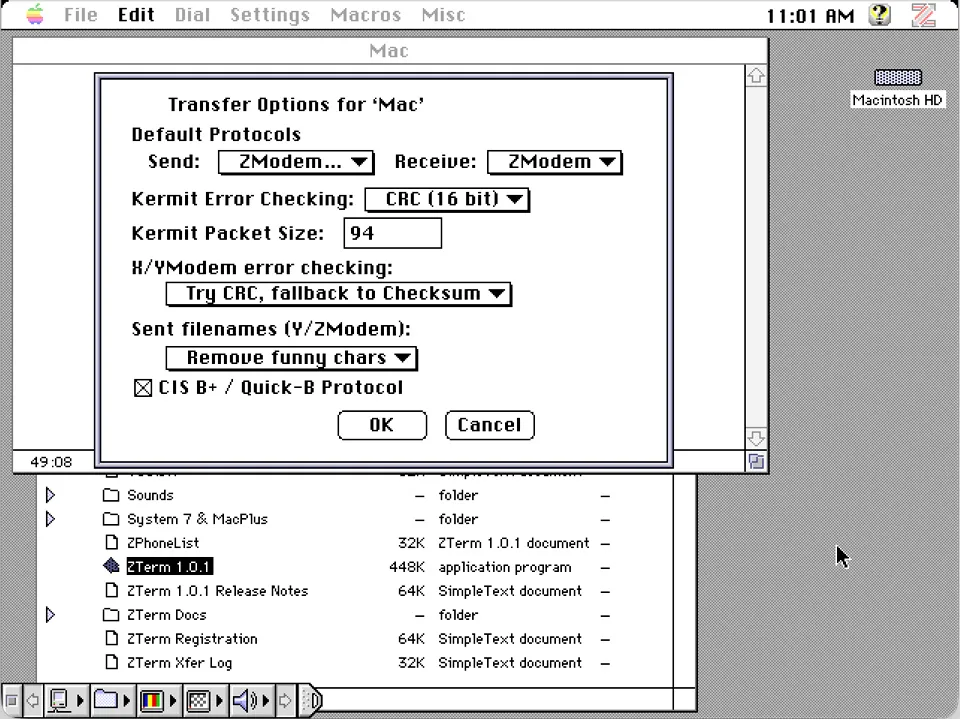
We will be using the ZModem protocol to receive files so select Settings > Transfer Options and set the send and receive protocols to ZModem.
ZTerm Transfer Options
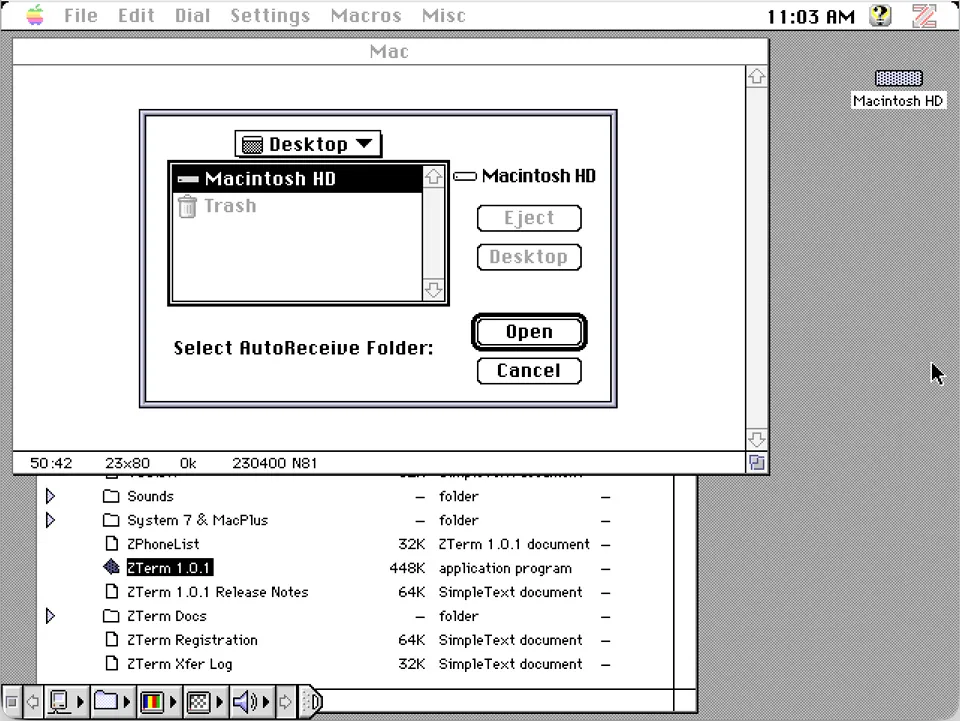
Next select Settings > Receive Folder and choose the folder where you want the received files to go.
ZTerm Receive Folder
When you are ready to receive a file select File > Receive ZModem. The ZModem Receive window will open and wait for a new file to be received.
Raspberry Pi
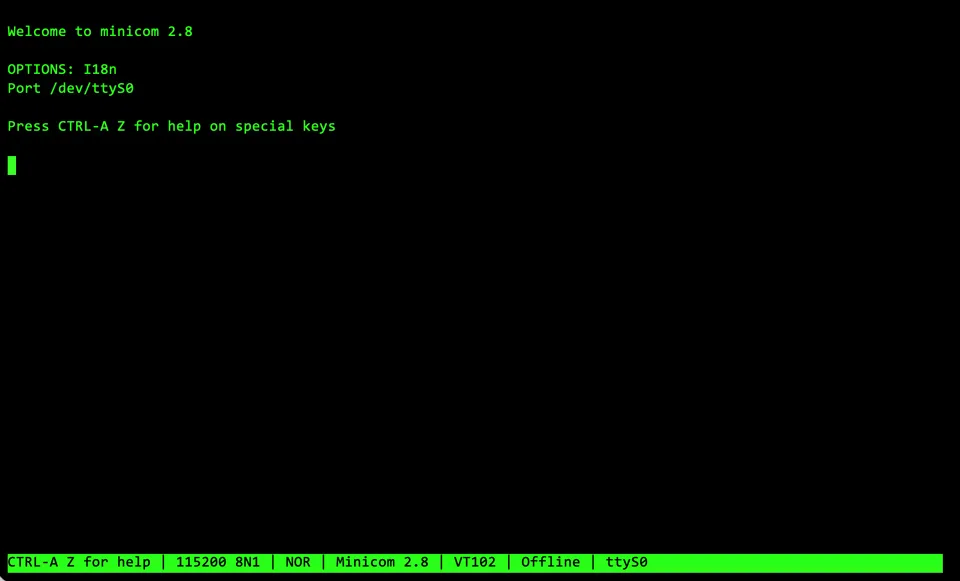
I used Raspberry Pi OS on a Raspberry Pi 4 to send the files to the Macintosh. The Minicom terminal program is not installed by default so you will first need to install it using apt-get.
sudo apt-get update
sudo apt-get install minicom
The UART port on the Raspberry Pi GPIO header is normally found at /dev/ttyS0 so we can use that to start minicom.
sudo minicom -b 115200 -D /dev/ttyS0If you used a different baud rate in ZModem change 115200 to the correct baud rate.
Minicom should open a new terminal screen. If you type anything on the Raspberry Pi keyboard it should appear on the display in ZTerm on the Macintosh.
Minicom Terminal
Most of the commands in minicom can be accessed using the CTRL-A key combination. To start a file transfer press CTRL-A followed by S. The upload prompt will appear, select zmodem and press Enter to open the file browser.
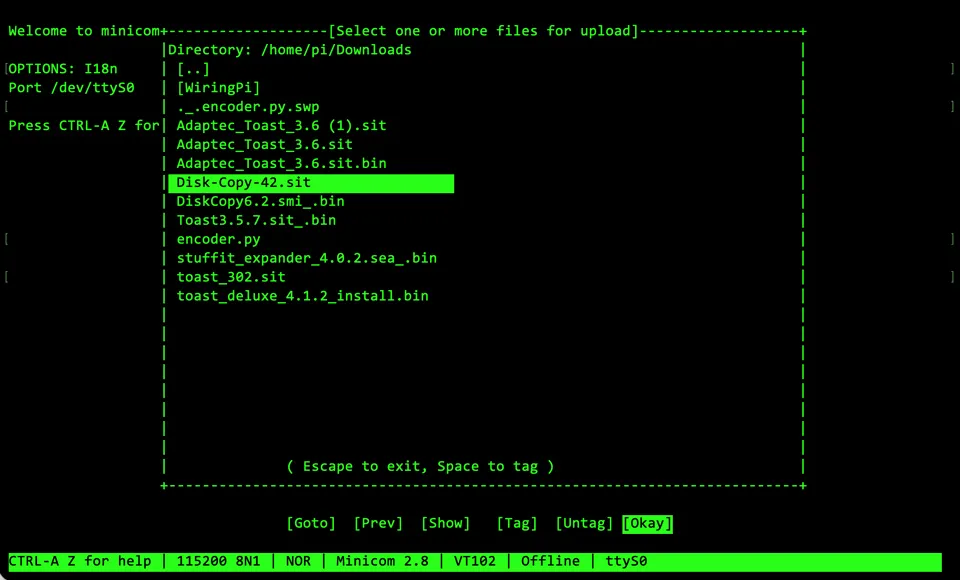
Minicom File Browser
You can select files for upload by pressing the space bar to tag them. Once you have selected the files use the arrow keys to select the [Okay] button and the files will begin uploading to the Macintosh.
The transfer time will depend on the file size and baud rate but if you are transferring anything more than 1Mb you may want to go and make a cup of coffee. Anyone old enough to remember using the internet with a dial-up modem will also remember how long you had to wait for files to download.
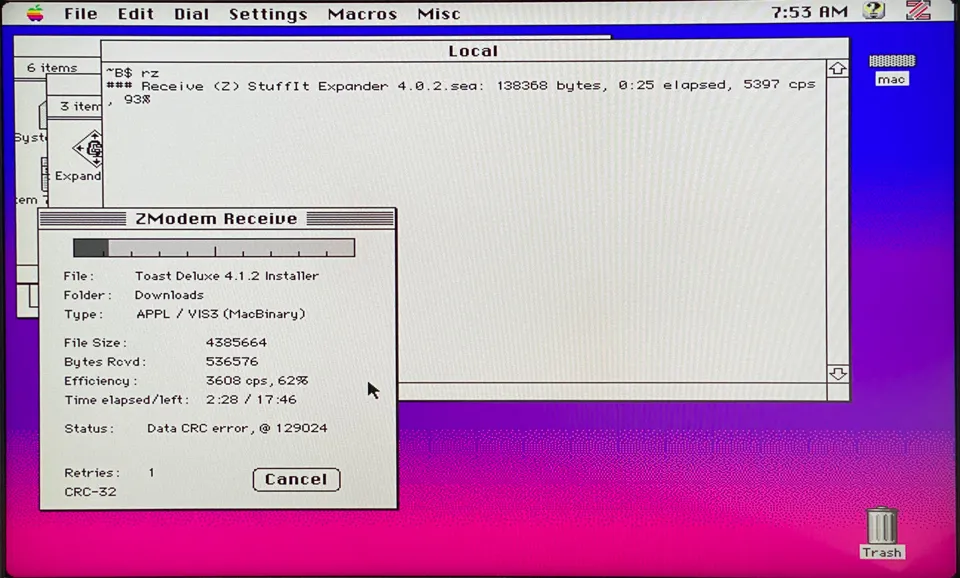
ZTerm File Transfer
Once the file transfer is complete you can close minicom using CTRL-A q.
I now have a working Apple Macintosh and at least two ways to get files onto it. The only problem is the 40Mb hard drive is filling up quickly. I could look for a larger SCSI hard drive but anything compatible will be at least 30 years old so it will be a gamble whether it will work.
Luckily the retro computing community has come to the help with the BlueSCSI.
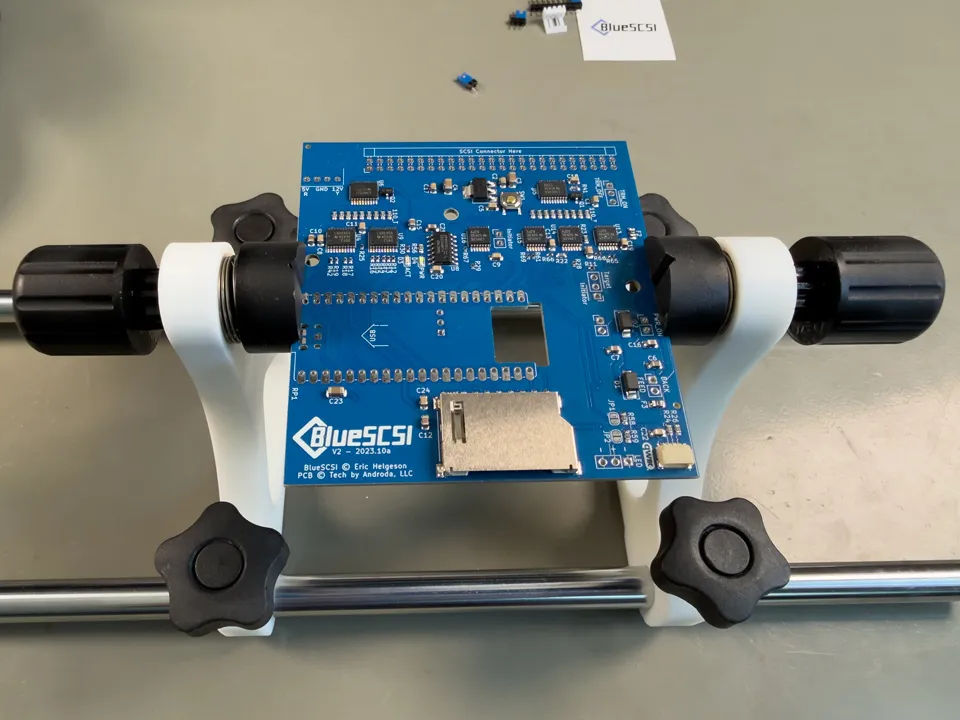
BlueSCSI
BlueSCSI is an open source SD card to SCSI adapter designed for vintage computers. It allows you to replace the existing hard drive with an SD card that can be configured as multiple hard drives, so you are not limited to 2GB drive sizes on old 32 bit systems.
It uses a Raspberry Pi Pico to interface between the SCSI port and the SD card. Using a Pico makes firmware updates simple as you can connect to the Pico with a USB cable and where it mounts as a drive. Installing new firmware is simply a case of dropping the firmware image into the drive and wait for it to reboot.
There are three versions of the BlueSCSI, Desktop, Laptop and DB25. The desktop version is designed to replace 3.5 inch hard drives commonly used in desktop and server computers. The laptop version is the same size as a 2.5 inch laptop hard drive. The DB25 version is designed for connecting to the external DB25 scsi port found on many of the old computers, including my Macintosh.
I wanted to replace the existing drive in my Macintosh so I bought the desktop version from Flamelily Retro, a UK based company that sells a range of parts for the retro computer market. As I already had a collection of Raspberry Pi Picos I bought the board only kit that came without a Pico. I also ordered a 3d printed adapter that allows the BlueSCSI to fit in a 3.5 inch hard drive bay.
When it arrived I soldered on the connectors and a Pico 2W. SCSI devices need a terminator on the last device in the chain, as this would be the only SCSI device in the Macintosh I installed the terminator jumper.
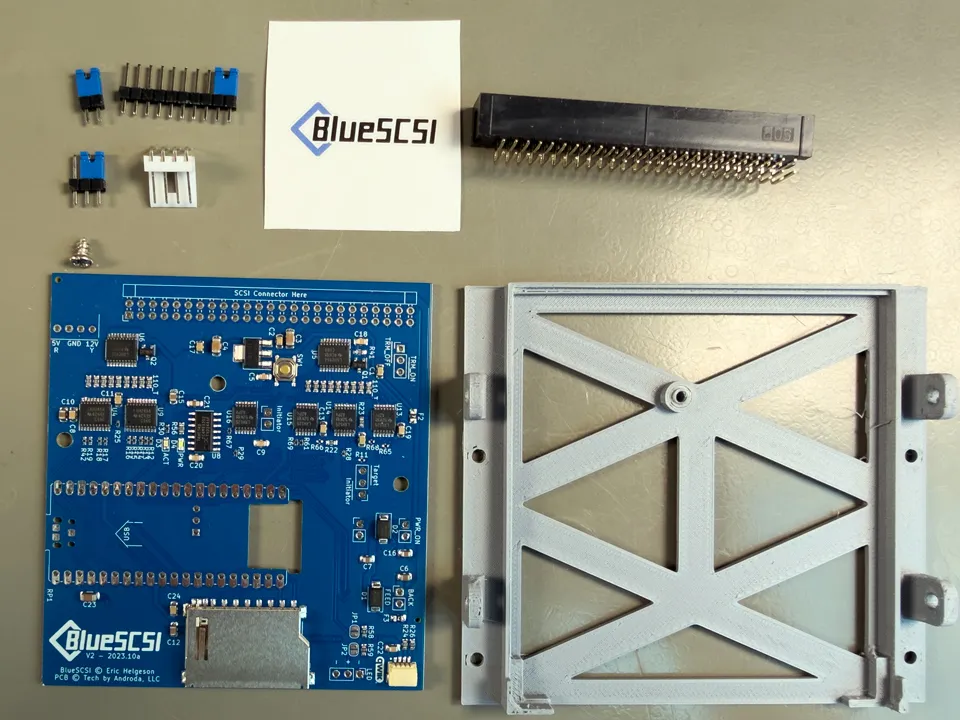
BlueSCSI Kit
BlueSCSI in Soldering Stand
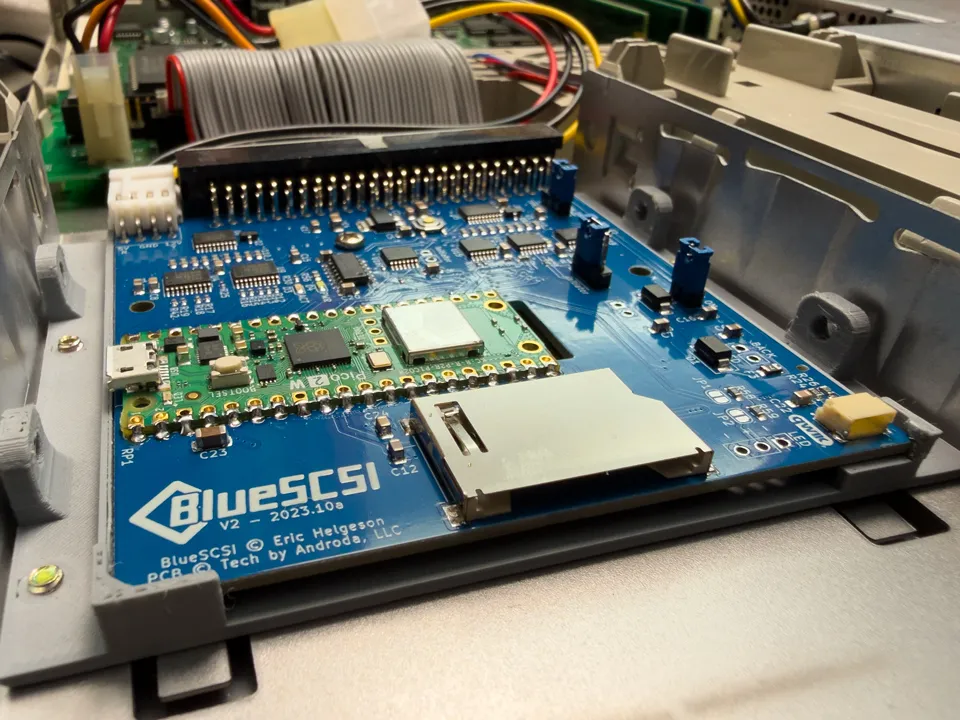
BlueSCSI Installed In The Macintosh
I installed the latest firmware release from the BlueSCSI website and formatted a 16GB SD card as FAT32.
There are a range of hard disk images available from BlueSCSI but I used a System 7.5.5 image that I found on macintoshrepository.org.
After renaming the hard disk image file as HD10_512.hda so that it would appear as the first hard disk device I put the SD card into the BlueSCSI, installed it in the Macintosh and turned it on. A few seconds later the loading screen appeared and it loaded System 7.5.5.
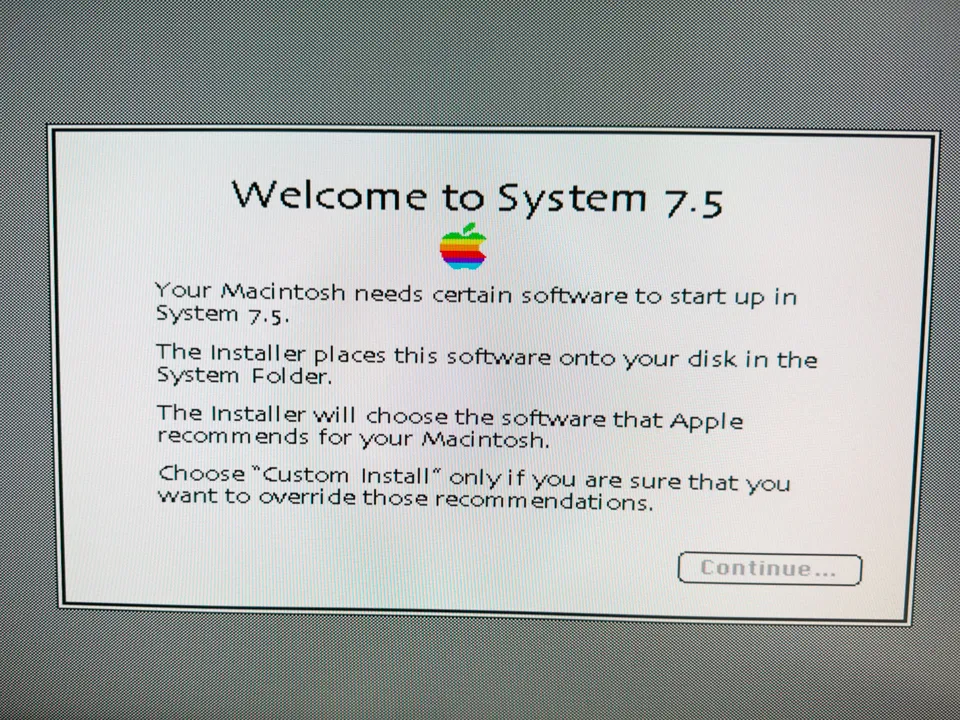
Apple Macintosh System 7.5.5
BlueSCSI have a hard disk image that contains several Toolbox applications. One useful application is the Transfer Utility that allows you to transfer files to and from your SD card to and from your Mac.
If I had bought the BlueSCSI first I wouldn’t have needed the Greaseweazle or serial cable but at least I can use them on other computers that don’t have a SCSI port.

Shawn Mulligan
I didn't have to write disk images, but rather transfer files,but I've found all of the following work well:
- USB floppy drive with HFS-formatted disks, mounted in Linux, which supports HFS format); format the disk in MacOS, then mount it on the PC and copy files to it
- USB floppy drive with DOS-formatted disks (this works if the Mac has PC File Exchange support)
- AppleTalk (Linux supports appletalk through "netatalk", so you can set up a file share and just access the files over the AppleTalk network); you can do this with Ethernet if your Mac has it, or RS-422 (the network or modem port on the Mac, using a 422 to 232 converter and USB serial port on the PC)
- FTP (if your Mac has Ethernet / TCP/IP); you can just host your own FTP server and use one of many Mac FTP clients to pull the data off
I have a Mac Quadra 800 that I use as an AppleShare server with Apple II support, to allow my Apple IIgs to netboot over AppleTalk; this works pretty well; copying Apple II disk images in 2mg format is easy-ish via FTP, and then I can run software on the IIgs to write those to real disks. I don't yet have a good way to write Apple II 5.25" disks outside of using ADT Pro, the IIgs doesn't seem to be able to reliably write 5.25" disks in GS/OS / ProDOS mode unfortunately...
Andrew
Thanks for your comments.
I am keeping a lookout for an ethernet card for the Mac which will make file transfers easier, using FTP like you suggested. It will also let me access the internet, or at least the parts that are still compatible with a computer this old.